How to Make a Chemigram
- Sep 28, 2021
- 4 min read
Updated: Jan 7, 2023
When Belgian artist Pierre Cordier wrote a dedication in nail polish on a slip of photographic paper in 1956, he discovered a unique artistic phenomenon. Expanding upon a legacy of cameraless image-making with photographic chemicals, Cordier continued his experiments, naming the technique the chemigram two years later.


Cordier wasn't the only artist to experiment with the chemigram process. German professor and polymath Johann Schulze is considered to be the first to obtain a chemigram-like image using opaque paper and silver salts in 1725. Hippolyte Bayard's sensitization trials also resulted in chemigram-like imagery in 1839. But a persistent and concentrated commitment to the chemigram process has established Cordier as a pivotal figure in the timeline of the chemigram overall, placing him alongside other experimental photomedia pioneers like Man Ray and Laszlo Moholy-Nagy.
What is a Chemigram?
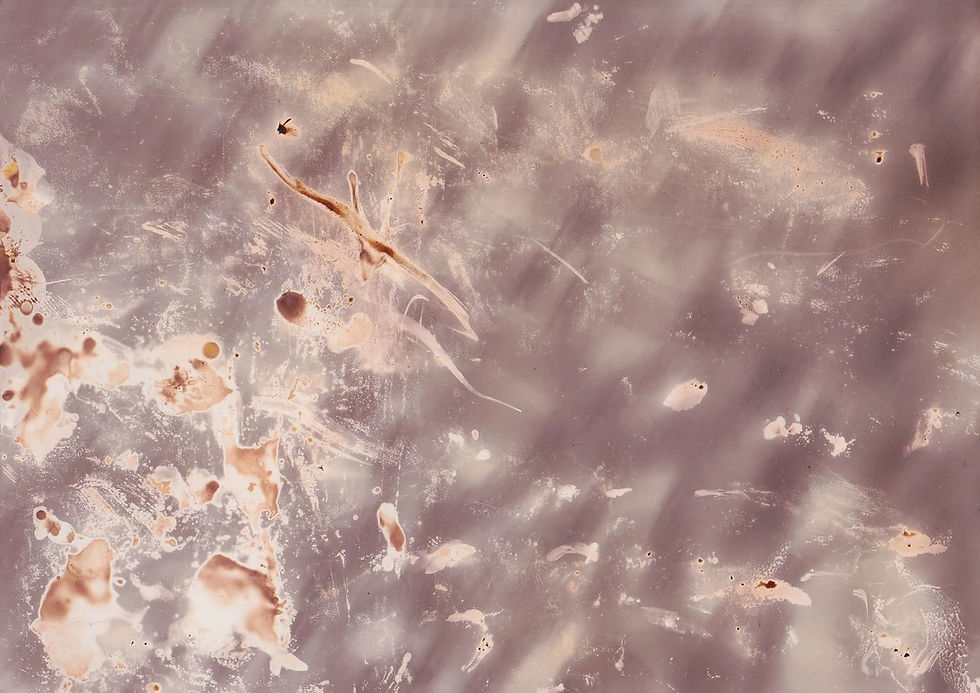
A chemigram is a meeting of painting and photographic chemistry. The experimental technique involves applying a substance or resist to a sheet of photographic paper and subsequently immersing the paper in developer and/or fixer. The resist repels and interacts with the darkroom chemistry, causing unique and abstracted manifestations.
While the painter's canvas is an inert, inactive material, a photosensitive emulsion is alive. The chemical products that constitute it make it possible to obtain unlimited variations in form and color - Pierre Cordier


...But what is a Chemogram?
Chemigrams are often confused with the chemogram. Invented in 1974 by Josef H. Neumann, chemograms are made by partially processing an enlarged image on photographic paper in the darkroom. When sufficiently developed, the paper is then exposed to light and selectively painted over with developer, fixer and other chemicals. Chemigrams on the other hand are made under consistently well-lit conditions with a substance applied directly to a sheet of photographic paper before development.
Chemigram Materials
Basic developing chemicals, photographic paper and a resist substance are the key components of chemigram production. Resist substances can vary from vegetable oils, resin, hand lotion, Vaseline, golden syrup, glue, tape, paint and nail polish, to dishwashing liquid, peanut butter, toothpaste, jam, butter, Vegemite, ink and varnish. The full list of chemigram materials includes:
Developer, stop bath, and fixer
Three shallow tubs for photographic chemistry
Gloves and/or tongs
A resist substance
Black and white photographic paper (including fogged and expired paper)
A selection of resist applicators
Running water
Applicator tools for applying resists to photographic paper will impact the way the resist manifests when developed or fixed. Sponges, a spray bottle, a chopstick, spoons or paint brushes work well. Using a brush creates a swept effect, a poured application creates a smoother, more uniform appearance and spraying resists from a spray bottle makes intricate islands of detail. Chemigram production is also a rare opportunity to make use of fogged or expired photographic paper that would otherwise go to waste.
How to Make a Chemigram
To prep for the chemigram process, make up the developer, stop bath and fixer in separate tubs with the standard manufacturer's measurements and dilutions. In a dark, light-tight room, take a few sheets of photographic paper out of the box or packet. Reseal the remaining paper stock to avoid fogging the whole supply and switch on the lights, the rest of the process can be done with the lights on.
Step 1 - Apply a Resist
Spread a layer of resist on a sheet of photographic paper with an applicator. A single resist can be applied for a more consistent result - different combinations of resists and applicator tools creates highly variable manifestations. The variations in the thickness of the resist substance will impact the outcome of the chemigram too.


Step 2 - Developing/Fixing
Completely immerse the resist-coated sheet of photographic paper in either the developer or fixer. Immersing the photographic paper in the developer first will create a dark background effect. Fixing the photographic paper first will make a light background. On contact with the chemicals, the resist will start to shift and dissolve, coaxing out elaborate textural fields.
Allow to the paper to develop or fix for 10 seconds. Remove the paper from the chemicals and observe for 10 seconds. If the effect is not pronounced enough, return the paper to either the developer or fixer for another 10 seconds. Repeat the process as necessary. Alternating between fixer and developer and adding, subtracting or adjusting resists between baths can help build up further layers of abstraction.
Step 3 - Stop Bath and Wash
Because making chemigrams is an experimental darkroom process, the completion of an image is subjective. That said, definition between different textural zones and a good level of dynamism and detail are favoured by chemigram makers. Once the chemigram looks complete, bathe the sheet in stop bath for a minute, fix for 3 minutes and then wash under running water for 10 minutes to remove chemicals and residual resists.


Further Experimentation
Using a variety of resists in different densities and with varied application methods will dramatically alter the appearance of a chemigram. Other variables include the age, level of exposure and type of photographic paper. Wet compounds that do not adhere well to the surface of the photographic paper will readily shift and lift off the emulsion when developed and fixed. Harder resists that are allowed to dry on photographic paper can become stiff and cracked. The chemigrams can also be made without the use of a resist at all, applying small amounts of developer and fixer directly to the surface of a photographic sheet of paper with various gestures and application tools.
IRIS28 receives an affiliate fee from certain online retailers (like Amazon) when readers click over to their website via the links provided on our site. This policy helps support the operation of our blog and allows us to keep access to our content free to the public. In any case, we always remain objective, impartial and unbiased in circumstances where affiliate links are included.


